

Getting the right amount of sleep each night can assist in maintaining good physical and mental health as well as aid in a child’s development. Yet, so many parents fight to get their kids an adequate amount of shut-eye each night. Take a look at our easy DIY that lends itself to lots of ‘beauty sleep’.
While many parents rely on different ‘tricks’ to make their children feel safe in their beds, our tree of life dreamcatcher and effective in ‘catching all the bad dreams’ and helping kids get a better night’s sleep, and is easy and fun to make. The best part is that almost all of the items can be found at the dollar store!
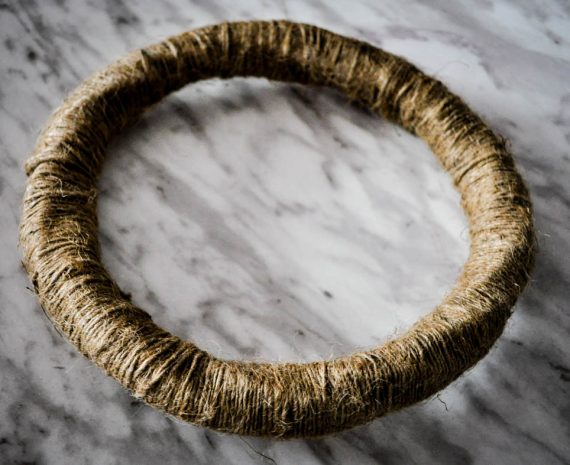
All you need:
- Wicker wreath
- twine (two rolls)
- Clothespins
- beads
- glue gun and glue
- scissors
- fake flowers for decoration
Step one:
Wrap your twine around your wreath to cover it completely. You can start off by tying a knot around the wreath and hide it when with twine when you tie off.
Step two:
Cut 20 pieces of twine that are the same length. You want to have it long enough so that when you fold it in half it still hangs about five inches below the wreath. For example, if your wreath is eight inches, you would want your twine to be about 21 inches long.
Step 3:
You are going to use the twine pieces to make your tree. To tie them on the wreath you take your length, fold it in half and place it behind the wreath holding the folding piece up like a loop. Take the two end pieces and pull them through the loop so that they have formed a tie around the wreath. You want to place one tie where you would like the branches to extend to on each side and then one in the middle. Fill in the gaps evenly until you have placed all the ties on the wreath.

step 4:
Each tie has two strings hanging down. Choose a tie in the middle and twist the two pieces together for about one inch. Secure with a clothespin. repeat two more times. Now incorporate the ties together at varying points. It should now look like a branch. Secure together with a clothespin.


Step 5:
Repeat step 4 until you have incorporated all the ties. You can do branches with as many as four ties or as little as two ties to make it look realistic.

Step 6:
Start twisting the branches together to form the trunk. Use twine to tie the trunk together at 1/2 inch intervals all the way down. Trim off the excess twine.


Step 7:
Take the hanging twine and tie around the bottom of the wreath to form the ‘roots’ in a triangle shape.

Step 8:
Glue beads onto the twine (unless the opening is large enough you can thread them on and knot to secure them). Add flower decoration if desired.*If you plan on using this as nursery decor, consider skipping any small decor that could be considered a choking hazard.


Now you have a beautiful excuse to have sweet dreams every night! Does your child have trouble falling asleep at night? Check out our blog on the science of sleep and make sure to follow us on Pinterest for more fun DIYs!
*Opinions expressed are those of the author, and not necessarily those of Parent Life Network or their partners.
Melissa Robertson
Melissa Robertson divides her time between her three daughters and writing for the Parent Life Network. In her 'spare time' she loves to be a total control freak while attempting to do crafts with her girls.

 Sponsored