Sponsored
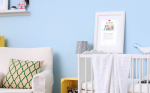
You’ve written a beautiful letter, why not showcase it? With a little time and some supplies, you can create this DIY keepsake with your Dear Baby letter.
There is nothing like a parent’s love for their baby, but sometimes our busy lives don’t allow the time to share those sweet sentiments with our little loves. PLN wants to give parents the opportunity to share their love and memories of their babies in a way that can be treasured for years to come. The bonus? By writing a letter to your little one, you have a chance to win $10,000 from PlaytexBaby™!

Materials
One 8×11 sheet of vellum paper (Michael’s can be an easy source)
Two 12×12 pieces of scrapbook paper (light backgrounds work best)
Glue
Scissors
11×14 Frame (local Dollar Stores are a cheap and quick place to shop)
Paint (Dollar Stores often sell this too!)
Paint brush
Mini prints (I chose a few of my favourite photos and printed the ‘mini print’ version at Walmart)

Easy step by step instructions
First things first, make sure you are a PLN member. Not a member? You are missing out on being part of Canada’s largest network of new and expecting parents and so many cool deals, ideas and giveaways! (#plug #sorrynotsorry)
Once you’re all signed up, follow the prompts to add your information for your letter.

Now you can get started on your letter! You can use the prompts to inspire you or follow your own path. There is no wrong answer.

Choose a picture to add to your letter to make it extra special and eye-catching. I chose black and white to really make it pop from the colourful background.

Instead of printing on regular paper, print your letter on vellum paper. (I just added the vellum sheet in front of the regular paper in my printer.)
Now take your frame apart and paint the frame. My frame was plastic and it took a bunch of coats to get my desired look.

Using the back of the frame as a guide, place your main sheet of scrapbook paper in the center of the frame. Using the coordinating sheet, glue a strip along the top and the bottom to fill the entire space.

Now glue your vellum letter in the middle of the frame and arrange the pictures around it.
Once your frame is painted and dry, you can trim the excess paper and assemble.
It’s ready to hang and enjoy forever!
Feeling like this DIY project is a bit too complicated for you? We hear you. Try this easier version instead!
Congratulations to Shelby H. of Benito, MB for winning the Dear Baby Contest–$10,000!!!

We also wanted to take this opportunity to thank everyone who took the time to enter. Your letters were a heartwarming joy to read.
*Opinions expressed are those of the author, and not necessarily those of Parent Life Network or their partners.
Melissa Robertson
Melissa Robertson divides her time between her three daughters and writing for the Parent Life Network. In her 'spare time' she loves to be a total control freak while attempting to do crafts with her girls.